When it comes to manufacturing and quality control, accurate and reliable measurements are crucial. However, measuring systems can sometimes introduce variations and inconsistencies that can affect the product’s quality. This is where Gage Repeatability and Reproducibility (GR&R) comes into play. GR&R actively assesses the variation that the measurement system itself contributes. By understanding the types of variations and estimating the total measurement variation, manufacturers can make informed decisions about the reliability and accuracy of their measurement systems. In this blog post, we will delve into the world of GR&R, explore its types, and provide insights on estimating total measurement variation to ensure quality control in your manufacturing processes.
- Gage Repeatability and Reproducibility (GR&R)
- Types of variations in GR&R
- Benefits of GR&R
- Estimating total measurement variation in GR&R
- Types of GR&R
- Example of GR&R
- Conclusion
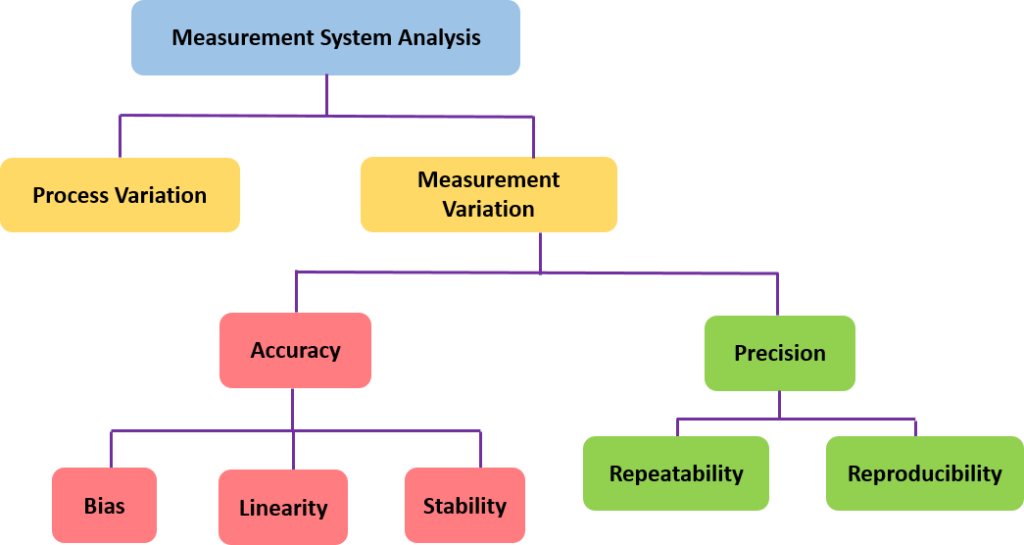
Measurement System Analysis (MSA) serves as a tool to examine the variability in various types of inspection, measurement, and testing equipment. This system is employed to evaluate the effectiveness and quality of the measurement process.
Gage Repeatability and Reproducibility (GR&R)
A gage refers to a measurement tool, ranging from simple devices like calipers and rulers to more intricate machinery or even software applications. GR&R is a methodology used to evaluate the variation in measurement data caused by the measurement system. The two critical components of measurement variation are repeatability, from equipment variance, and reproducibility, arising from inspector or operator differences. GR&R reveals:
- 1. The level of measurement system variation relative to process variability.
- 2. Operators influence the extent of variation in the measurement system.
- 3. The measurement system’s ability to differentiate between diverse parts.
GR&R systematically evaluates instrument’s accuracy, ensuring the repeatability and reproducibility of measurements. This involves conducting a series of measurements to verify consistent outputs for a given input under the same operational conditions over a specified duration.
- A low repeatability value signifies high precision and reliability in measurement data.
- Reproducibility assesses measurement consistency by different operators using the same equipment under the same conditions.
- A low reproducibility indicates the measurement system’s independence from operator skill or judgment.
- It signifies the system’s ability to produce consistent results across various operators.
- Estimating total measurement variation involves analyzing repeatability and reproducibility components in a GR&R study.
Types of variations in GR&R
To assess the reliability and accuracy of a measurement system, it is essential to delve into the different types of variation involved in Gage Repeatability and Reproducibility (GR&R). By identifying and quantifying these variations, one can conduct a comprehensive evaluation.
1. Repeatability
Repeatability is the first type of variation, representing the inconsistency that arises when the same operator, utilizing the same equipment, takes multiple measurements on the same part. This aspect serves as a crucial measure of the consistency and precision of the measurement system. High repeatability indicates a lack of consistency in measurements by the same operator and equipment, potentially leading to unreliable results.
2. Reproducibility
The second type of variation, reproducibility, focuses on the inconsistency observed when different operators use the same equipment to measure the same part. This dimension evaluates the consistency and reliability of the measurement system across various operators. Elevated reproducibility suggests that measurements taken by different operators using the same equipment lack consistency, potentially leading to unreliable outcomes.
3. Part Variation
In addition to repeatability and reproducibility, part variation is considered. This factor accounts for variability in measured parts. Importantly, part variation is beyond the control of the measurement system and plays a pivotal role in estimating the total measurement variation.
Understanding these distinct variations is crucial for accurately estimating the total measurement variation in a GR&R study. Quantifying each type of variation makes it possible to pinpoint the specific sources of variability in the measurement system and take appropriate actions to enhance its reliability and accuracy.
Benefits of GR&R
- GR&R identifies and resolves measurement system issues
- Enhances accuracy by addressing highlighted problems
- Improves the reliability of measurements
- Enables informed decision-making on measurement consistency
- Systematically mitigates variability for more dependable measurements
- Provides actionable insights for issue rectification
- Contributes to overall process optimization
- Instills confidence in measurement reliability
Estimating total measurement variation in GR&R
The “repeatability” aspect in GR&R refers to the variation in measurements:
- Using one measuring instrument
- When employed multiple times by the same operator
- While measuring an identical characteristic on the same part
The standard deviation for repeatability (σe) is calculated using the formula displayed, where R is the average range of repeated measurements.

The “reproducibility” aspect is the variation in the average of measurements by different operators:
- Using the same measuring instrument
- When measuring the identical characteristic on the same part
Reproducibility is estimated by finding the range (R0) from the overall average for each appraiser. The standard deviation for reproducibility (σ0) is estimated accordingly.

The measurement system variation (R&R or gage R&R) is represented by σR&R.
Part-to-part variation
Part-to-part variation contributes to the total measurement variation and can be determined from the measurement system data or an independent process capability study. If using the measurement system study, the part standard deviation σp (PV) is estimated by Rp /d2*.
Total Measurement Variation
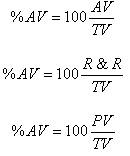
Total variation (TV or σTV) is calculated by summing the square of repeatability and reproducibility (R&R) variation and the part-to-part variation PV, taking the square root.

The contribution of equipment variation (EV) is expressed as 100(EV/TV). Other factors’ contribution to total variation TV can be similarly calculated.
Types of GR&R
Crossed Gage R&R
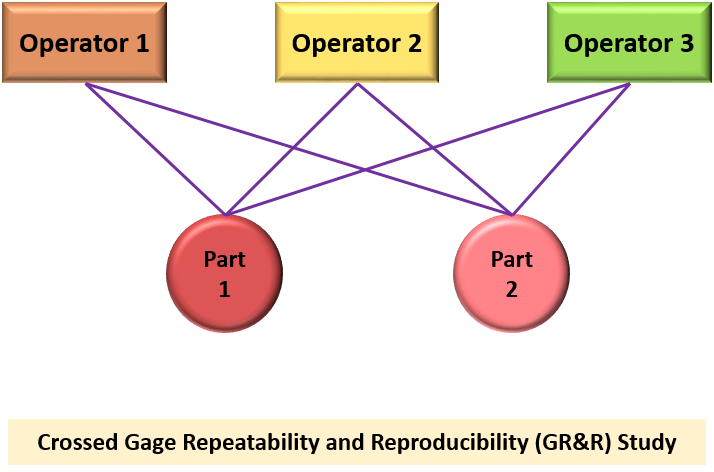
- Involves each operator measuring each part.
- Applied in non-destructive testing scenarios where parts are not destroyed during measurement.
- Assesses how much process variation is due to measurement system variation.
- Suitable for scenarios like measuring the length of a part.
Nested Gage R&R
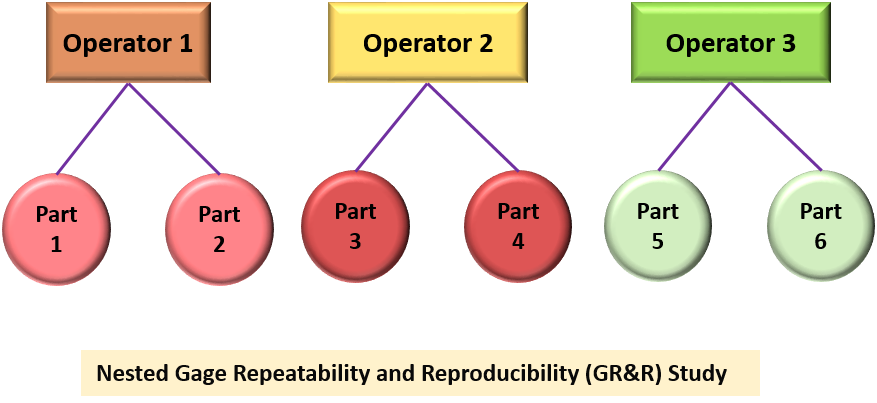
- Involves only one operator measuring each part.
- Used in destructive testing scenarios where the test destroys the part.
- Requires identifying a batch of material close to the original, assuming homogeneity.
- Examples include testing force to open a bag of chips or the strength of a rope until it breaks.
Expanded Gage R&R
Standard GR&R studies, whether crossed or nested, analyze the impact of two factors in the measurement system, usually operator and part. However, understanding the measurement system fully often requires considering a third variable, commonly the gage, which is introduced alongside the standard GR&R study to provide a more comprehensive assessment.

- Expanded Gage R&R assesses the effects of three or more factors, such as operator, part, and additional variables like gage, lab, or location.
- It is suitable when more than two factors need evaluation.
- Accommodates missing data points and provides flexibility with fixed or random factors.
- Allows analysis of interactions between additional factors, operators, and parts.
- Adjusts the data collection plan to reduce sample size when evaluating multiple factors.
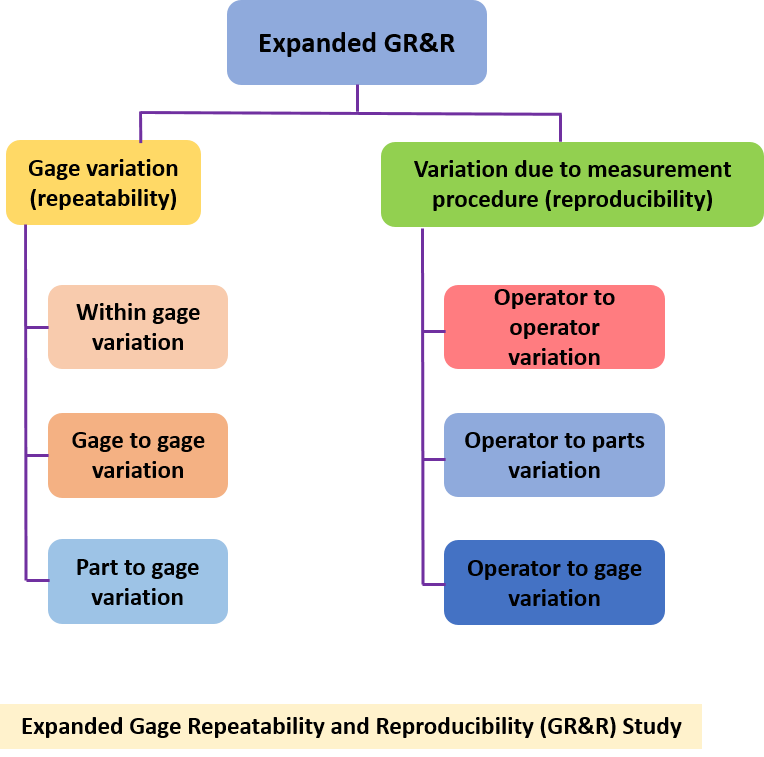
Difference between a Standard and an Expanded GR&R study
Expanded GR&R broadens the assessment beyond operator and part, allowing for the analysis of additional factors and their interactions. It provides flexibility in handling missing data points, adjusts sample sizes for practicality when evaluating multiple factors, and is cost-effective compared to standard GR&R. Particularly useful in situations with limited data, it offers a comprehensive understanding of the measurement system.
Example of GR&R
Measurement Data:
- Tool: Caliper
- Operators: Alex, Beth, Chris
- Trials: Each operator measures a metal rod three times
| Trial | Alex | Beth | Chris |
|---|---|---|---|
| 1 | 10.2 | 10.0 | 10.1 |
| 2 | 10.1 | 10.2 | 10.0 |
| 3 | 10.0 | 10.1 | 10.2 |
Repeatability:
- Average Range (R̄): 0.2
Reproducibility:
- Overall Average Range (R̄₀): 0.2
Gage R&R:
- Repeatability Standard Deviation (σe): ~0.086
- Reproducibility Standard Deviation (σ₀): ~0.086
- Total Gage R&R (σR&R): ~0.121
Lean Six Sigma Assessment:
- Total Gage R&R within acceptable limits
- Reproducibility slightly higher than repeatability
- Lean Six Sigma principles guide improvement if needed
This simplified example uses Lean Six Sigma principles to assess measurement reliability, where small, acceptable Gage R&R values align with Lean Six Sigma’s focus on minimizing variability.
Conclusion
Gage Repeatability and Reproducibility (GR&R) is a vital methodology for assessing measurement system variation, with repeatability and reproducibility as critical components. Understanding the types of variations, including part variation, is crucial for accurately estimating total measurement variation. Estimating GR&R involves distinct studies, such as crossed, nested, and expanded, each serving specific purposes. While a standard GR&R assesses two factors (operator and part), expanded GR&R accommodates additional factors, providing flexibility and insights. The choice between standard and expanded GR&R depends on data availability and the nature of the measurement test. GR&R is important for identifying and rectifying measurement system issues, enhancing accuracy, and optimizing overall process control.
